
Currently Empty: $0.00
How to Grow Lettuce Leaf Basil in Mason Jars (A Cozy Kitchen Garden Project!)
Hello, lovely friends of The Angelina Store! I’m thrilled to share a little kitchen garden project that’s close to my heart: growing herbs in mason jars. Today, we’re focusing on Lettuce Leaf Basil from Baker Creek Heirloom Seeds—it’s a gorgeous variety with big, crinkly leaves that grow fairly quickly, making it perfect for this simple setup. I’m starting some basil plants today, and I’ll be snapping photos along the way to show you exactly how it’s done. We’ll even do a quick weekly check-in on the blog to watch them grow, and once they’re ready to harvest, I’ll share a post on how to make pesto (and freeze it in ice cube trays for easy cooking!). This project is all about bringing a bit of green into your space, and it’s a perfect way to add some calm to your day. Let’s get started!
I’m growing my basil using the Kratky method, which I love because it’s a “set it and forget it” way to grow herbs—no pumps, no fuss, just a simple setup that lets your plants thrive with minimal effort. It’s perfect for a cozy kitchen garden project, and I can’t wait to show you how it works!
What You’ll Need
This setup is for one quart-sized mason jar, but you can use as many jars as you’d like—I’m starting a few new Lettuce Leaf Basil plants today, the pictures in this post are basil I’ve grown in the past. Here’s what you’ll need for each jar:
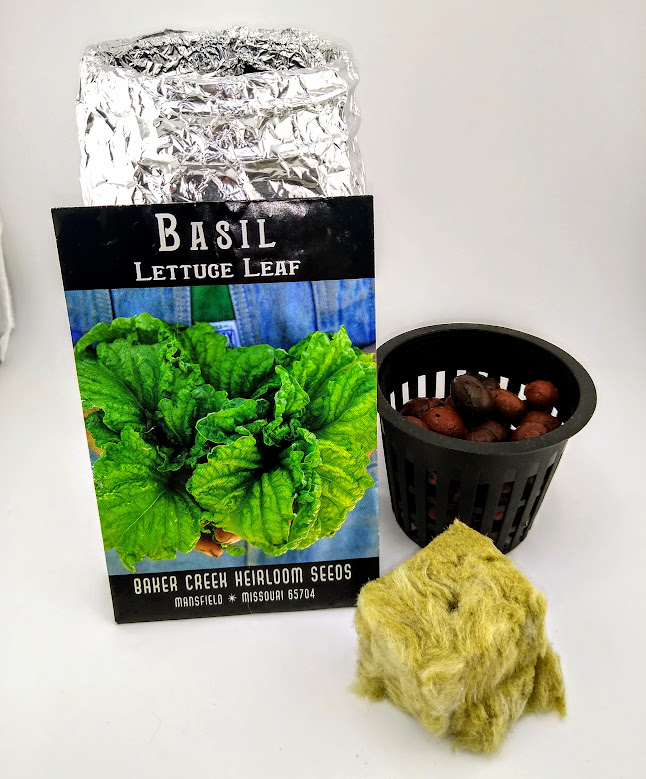
- 1 quart-sized mason jar (the wide-mouth ones work best)
- Foil to cover the jar, or black paint to coat it (light causes algae growth, which isn’t good for the roots, so we need to keep it dark)
- A net cup that fits the mason jar perfectly (I use a 3-inch net cup—it sits right in the mouth of the jar)
- LECA (lightweight expanded clay aggregate ot, as my son calls them, “cocoa pebbles”) to fill the net cup (about ¾ cup per jar—make sure to rinse and wet it first)
- A small piece of rockwool (about 1-inch cube or even less, you only need enough to seat the seed, soaked in water first) to germinate the seed
- Lettuce Leaf Basil seeds from Baker Creek (www.rareseeds.com—I love their seeds because they’re heirloom and non-GMO and they have an absolutely gorgeous catalog.)
- Distilled water (to start) and nutrient solution (for later—I use a half-strength mix the first time, and I keep a gallon jug of pre-mixed water and nutrients ready to go).
- A sunny window or a grow light (basil loves light, so make sure it gets 6-8 hours a day)
- Optional: A plastic baggie or plastic dome (like a Slurpee lid) to create a mini “greenhouse” effect during germination, or an inexpensive hydroponic system if you want to start the seeds that way (I’ll stick to the jar method for this post.) Or you can start these in germination trays under a grow light and then transfer to the Kratky jar once the true leaves have formed.
Let’s Grow Some Basil!
I’m starting my basil plants today, and I’ll be taking photos to show you each step—it’s so easy, and you’ll have fresh basil in no time! This is a simple project, so we won’t get into complicated stuff like pH levels—just the basics to get you growing.
Step 1: Prep Your Mason Jar
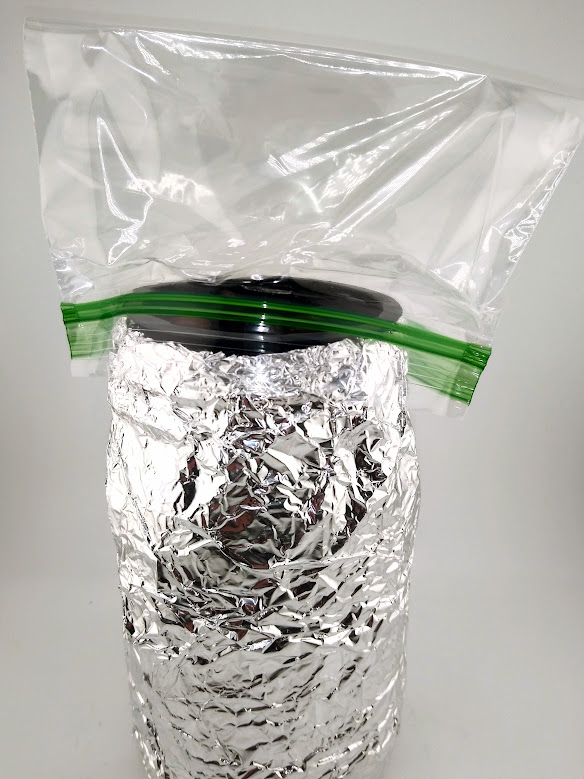
First, we need to keep light out of the jar to prevent algae growth, which can harm the roots. I used to wrap my quart-sized mason jars with foil—it’s quick and easy, but I was growing a lot of things and it seems like a waste of foil, so I started painting the jars black. But that was too boring, so I began decoupaging my Kratky jars. You can also paint the jar black if you prefer a more polished vibe. Either way, make sure the jar is completely opagque so no light gets in.
Step 2: Set Up the Net Cup
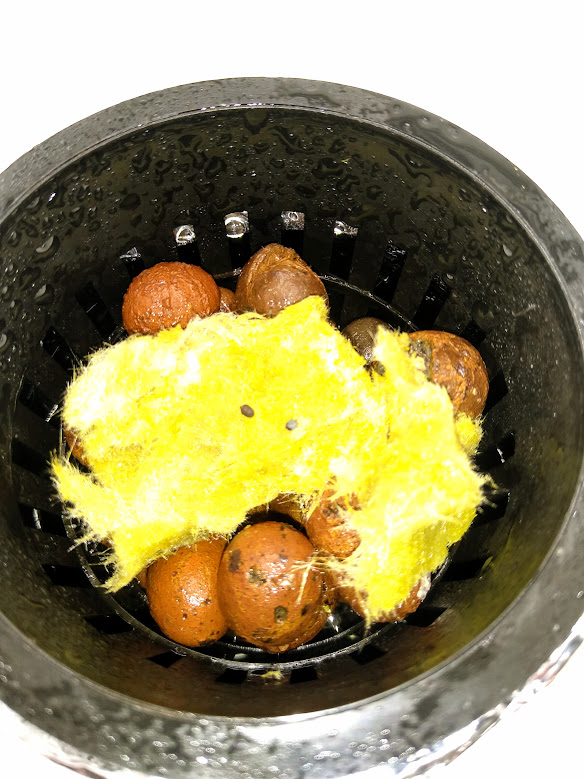
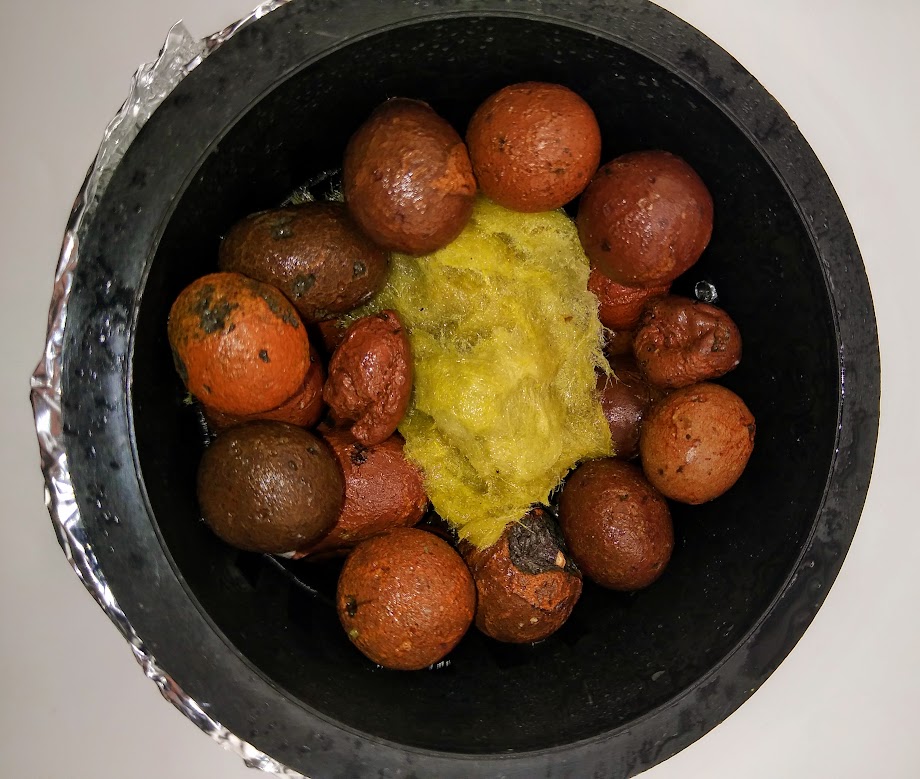
Grab your net cup (I use a 3-inch one that fits perfectly in the mouth of a wide-mouth mason jar) and fill it about ¾ of the way with LECA. Before you do, rinse the LECA thoroughly to remove any dust, then soak it in water for a few minutes—it should be nice and wet. LECA is great because it holds moisture and gives the roots something to grow into. Now, take a small piece of rockwool (about a 1-inch cube) and soak it in water until it’s fully saturated. Nestle the rockwool into the LECA, right in the center of the net cup.
Step 3: Add Water and Test the Net Cup
Fill your mason jar with distilled water until the water line comes up about ¼ inch above the bottom of the net cup when you place it in the jar. This ensures the rockwool stays moist during germination, which is super important. Pop the net cup into the jar and double-check the water level—adjust if needed. The roots will grow down into the water as the plant develops, so we want to make sure they can reach it.
Step 4: Plant the Seed
Now it’s time to plant your Lettuce Leaf Basil seed! Check the seed packet instructions first—some seeds, like cilantro, need to soak for 24-48 hours and have their outer shell cracked, but basil usually doesn’t need that. I’m using Baker Creek’s Lettuce Leaf Basil, and these seeds are ready to go as-is. Place one seed in the center of the rockwool, pressing it down gently so it’s snug. Don’t bury it too deep—just enough so it’s in contact with the moist rockwool.
Step 5: Create a Mini Greenhouse (Optional)
To help the seed germinate, you can create a little “greenhouse” effect by placing a plastic baggie over the top of the jar (I like to leave it slightly open so the seedling will get air). This keeps the humidity high, which basil loves. If you have an inexpensive hydroponic system, you could start the seeds there instead, but I’m keeping it simple with the jar method for this project. Either way, make sure the rockwool doesn’t dry out during germination—check it daily and spritz the rockwool with little water if needed.

Step 6: Give It Light and Love
Place your jar in a sunny window where it’ll get 6-8 hours of light a day, or use a grow light if your space doesn’t get enough natural light. Basil loves warmth and light, so a south-facing window is perfect. I’m setting mine under a grow light as March in Seattle doesn’t provide enough window light to get basil germinating. Keep an eye on the rockwool to make sure it stays moist, and in about 5-10 days, you should see a little sprout popping up.
Step 7: Switch to Nutrients Once True Leaves Appear
Once your basil sprout develops its “true leaves” (the second set of leaves that look more like basil leaves, not the tiny seed leaves), it’s time to switch out the plain water for a nutrient solution. I use a half-strength mix the first time to avoid overwhelming the young plant—basil doesn’t need a lot at this stage. I keep a gallon jug of pre-mixed water and nutrients on hand, so it’s easy to refresh the jar when needed. Just pour out the old water, add the nutrient solution up to the same ¼-inch-above-the-net-cup level, and pop the net cup back in. As the roots start to grow beneatht he net cup, it’s good to keep an “air gap” between the net pot and the water, with the root ends in the water.
Step 8: The “Set It and Forget It” Kratky Method
Here’s the magic of the Kratky method: once your basil’s true leaves appear, you’ve pretty much set it and can forget it! No pumps or fancy equipment needed—the roots grow down into the water, taking up nutrients as they need them, while the water level drops over time, creating an air gap for oxygen. All you have to do is refresh the nutrient solution every week or so, and your basil will do the rest. It’s the easiest way to grow herbs, leaving you more time to enjoy the cozy vibes of The Angelina Store!
Step 9: Watch It Grow (and Check In Weekly!)
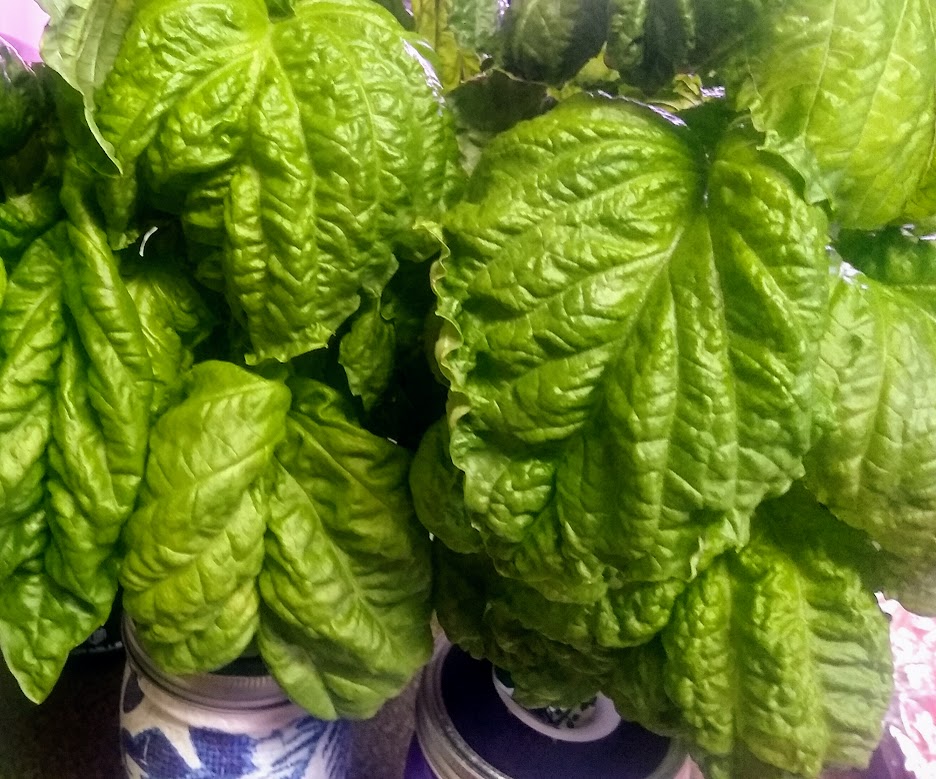
Now the fun part—watching your basil grow! Lettuce Leaf Basil grows fairly quickly, and those big, crinkly leaves are so pretty. I’ll be doing a quick weekly check-in on the blog to show you how the ones I planted today (March 23, 2025) are doing, with photos to track their progress. Once the basil is ready to harvest (in about 6-8 weeks), I’ll share a post on how to make pesto with your fresh leaves—and we’ll freeze it in ice cube trays for easy cooking all year round. Stay tuned!
Angelina’s Tips for Success
Here are a few tips to make sure your basil thrives:
-
- Keep It Dark: Don’t skip the foil or black paint—light in the jar can cause algae growth, which is bad for the roots.
-
- Don’t Let It Dry Out: During germination, the rockwool needs to stay moist. If it dries out, the seed might not sprout, so check it daily and spritz it with a little water if needed.
-
- Refresh the Water: Every week or so, refresh the water (or nutrient solution) in the jar to keep it clean and give your basil the best chance to grow.
I’ve been thinking of making Kratky kits to make this project even easier—each kit would include a hand-decoupaged jar, a basket, LECA, and rockwool, so all you’d need is the seed or seeds of your choice, a sunny window or grow light, and liquid nutrients. I’d love to hear from you—would you like to see Kratky Kits on The Angelina Store? Drop a comment below or send me a message to let me know!
Why I Love This Project
Growing herbs in mason jars is such a simple way to bring a bit of green into your life—it’s wonderful to have a year-round, indoor mini garden! Lettuce Leaf Basil is one of my favorites because it grows quickly and those big leaves are perfect for cooking and salads (or just admiring). Plus, it’s a great way to slow down and enjoy the little things, which is what The Angelina Store is all about. Happy growing, friends—I can’t wait to hear how your basil turns out!
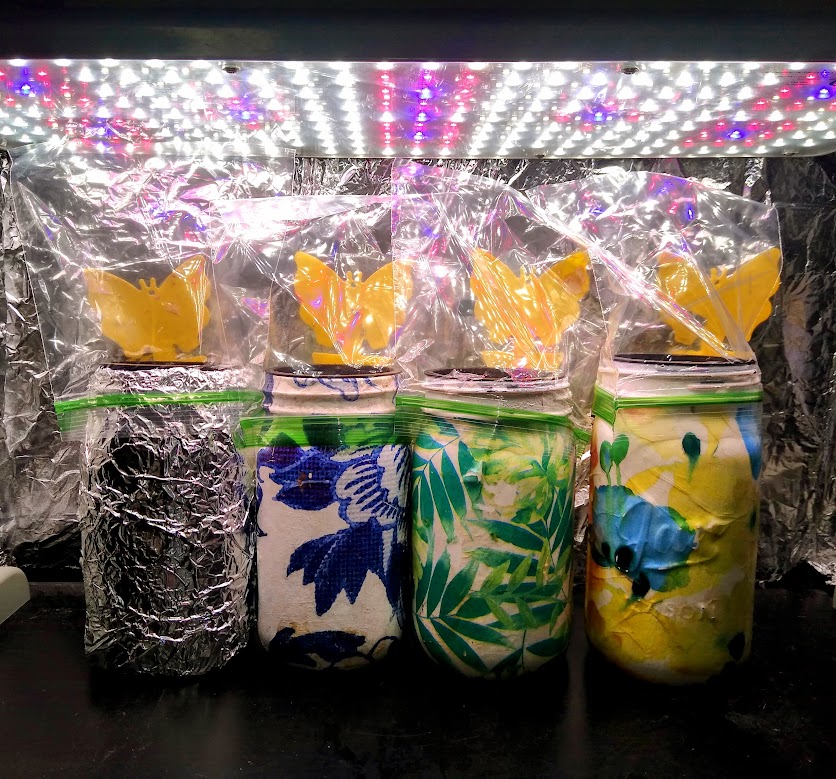
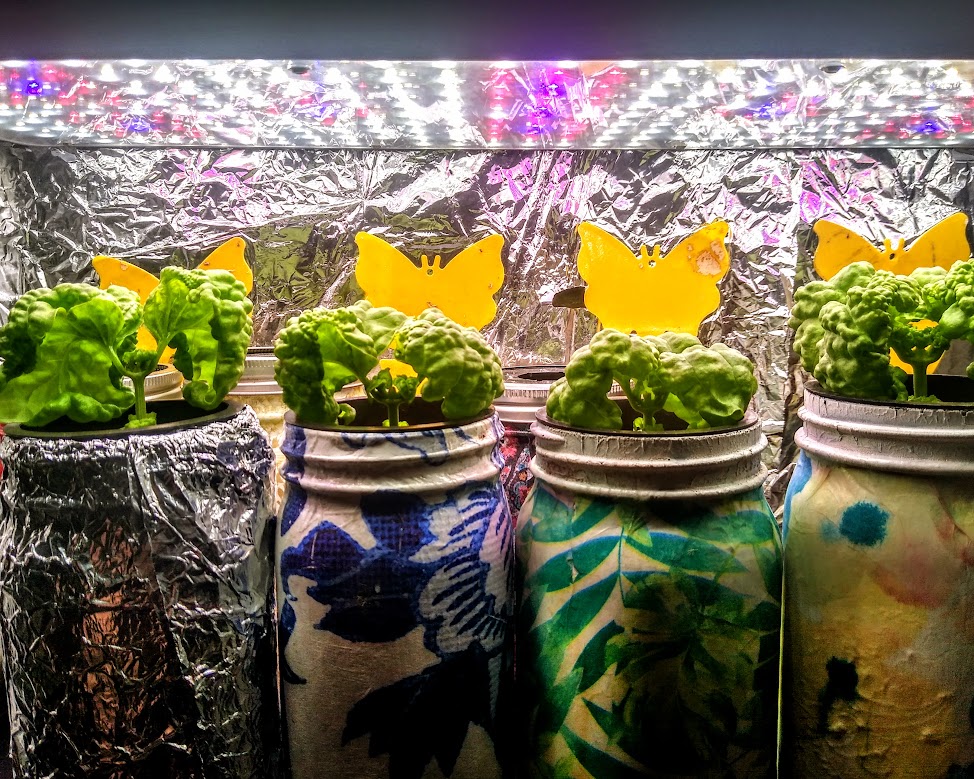
Note: The little yellow butterflies shown in the above image are sticky aphid traps stuck to the make-shift reflector (cardboard covered with foil). Though they have not caught any aphids, they are there just in case, and not necessary to grow your basil.
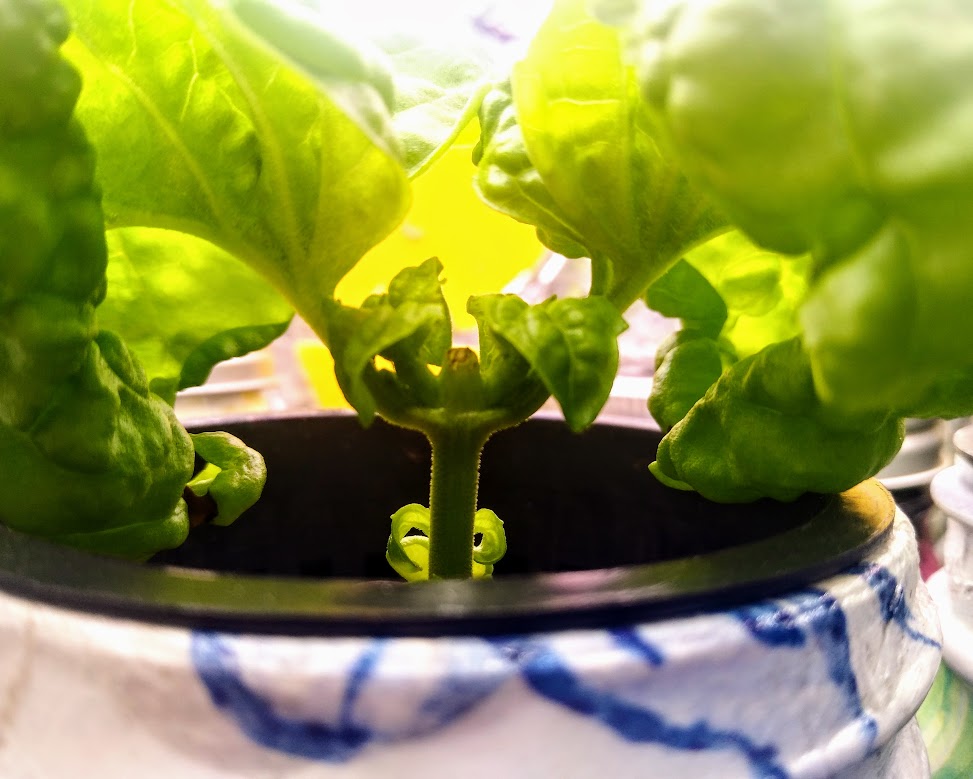
The basil was planted on Sunday, March 23, 2025. Today is Sunday, April 27, 2025 and as you can see, the basil plants are coming along. Aside from changing the nutrient-rich water, the only thing I did was “pinch” a few leaves to encourage bushy growth. You can see the tiny leaves sprouting around the pinched stem.
