Currently Empty: $0.00

The Art & Science of Wick Selection for Beginning Candle Makers
At The Angelina Store, we’ve learned a thing or two about candle making, often through trial, error, and a fair share of wax-covered lessons. I’m stubborn, impatient and I like to “learn as I go,” which has resulted in more messes than I can count! By no means an expert (there’s always room for improvement), I do have experience to share that may save beginning candle-makers some time, trouble and expense.
As I sit here test burning a wick for a molded candle, I’m reminded of one of the most crucial steps for any candle maker: choosing the right wick. Some of my first candles burned like mini-outdoor fireplaces, with four-inch flames blasting upwards, wildly flickering.
Choosing the right wick is a process that can make or break your candle, and it’s not as simple as it seems. So, let’s light up some advice for beginners with a “Lessons Learned” guide on why wicks matter, why test burns are non-negotiable, and how to navigate the winding path of wick selection.
Why Wicks Matter
A wick isn’t just a piece of string—it’s the heart of your candle, the engine that drives the burn. Pick the wrong one, and you’ll end up with a candle that tunnels (burning a hole down the middle), soots excessively, or drowns in its own melt pool. Too small, and the flame will be weak, leaving unburned wax along the edges. Too large, and you’ll get a roaring flame that burns too hot, smokes, or even cracks your container. The right wick ensures a clean, even burn, a steady flame, and a scent throw that fills the room without overwhelming it.
But here’s the catch: there’s no one-size-fits-all solution. The perfect wick for one candle might be a disaster for another, even if you’re using the same wax and container. Let’s break down the factors that influence wick choice and why test burns are your best friend.
The Variables of Wick Selection
Wick selection is a balancing act, and several factors come into play:
Type of Wax: Different waxes burn at different temperatures. Soy wax, like I use for my “Les Fleurs du Melt” wax melts, burns cooler and slower, often requiring a larger wick to create a full melt pool. Beeswax burns hotter and might need a smaller wick to avoid overheating. Coconut wax, often blended with soy, burns at a moderate rate but can vary depending on the blend. Each wax type interacts differently with the wick, so you’ll need to adjust accordingly.
Type of Wick: Wicks come in various materials, each with its own quirks. Cotton wicks (like the CD or ECO series) are classic and versatile, offering a steady burn for most waxes. Hemp wicks burn slower and cooler, which can be great for softer waxes like soy but might struggle with hotter waxes like beeswax. Wood wicks add a crackling ambiance but can be finicky, often requiring a larger size to avoid tunneling, especially in wider containers. I’ve found cotton wicks work best for my molded candles, but it’s worth experimenting to find what suits your style.
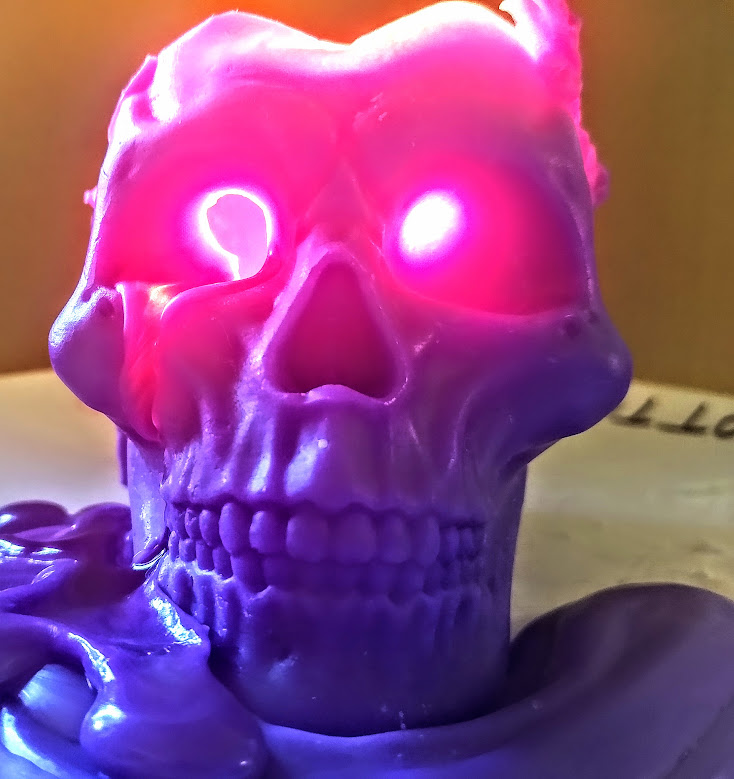
Size of Mold or Container: The diameter of your candle determines how much wax needs to melt for a full pool. A small votive (1.5 inches wide) needs a smaller wick than a 4-inch-wide jar. For my skull-shaped molded candles, the odd shape makes this even trickier—the narrow top and wider base mean the melt pool doesn’t form evenly, so I often have to compromise on wick size.
Fragrance Load and Type: Fragrance oils can drastically affect how a wick burns. A heavy fragrance load (e.g., 10% vs. 6%) can clog the wick, leading to a weaker flame or more soot. Even the type of fragrance matters—some oils, like citrus or vanilla, burn hotter than florals like honeysuckle or geranium. I’ve noticed that the same wick in the same jar with the same soy wax can burn perfectly with one scent but struggle with another, just because of the fragrance’s chemical makeup. Brands matter too; a honeysuckle oil from one supplier might burn differently than another’s due to variations in formulation.
The Deep Dive: Wick Sizing
Choosing the right wick size is where the real work begins. Wicks are typically labeled by series (e.g., CD, HTP, ECO) and size (e.g., CD-8, HTP-104). The size indicates the wick’s diameter and burn rate, but it’s not universal—what’s a “medium” in one series might be a “large” in another. This is where test burns come in, but first, let’s look at how to narrow down your starting point.
CandleScience, a trusted resource in the candle-making community, has an excellent wick guide that I often refer to. They recommend starting with the container diameter:
- 1–2 inches: Small wicks (e.g., CD-3, HTP-31)
- 2–3 inches: Medium wicks (e.g., CD-8, HTP-83)
- 3–4 inches: Large wicks (e.g., CD-14, HTP-126)
For molded candles like my skulls, it’s trickier. The irregular shape means the melt pool doesn’t form evenly, so I often start with a wick size for a slightly smaller diameter than the widest part of the mold (e.g., treating a 3-inch-wide skull like a 2.5-inch jar). CandleScience also suggests factoring in wax type and fragrance load—soy wax with a high fragrance load might need a larger wick to ensure a full melt pool.
The National Candle Association (NCA) also emphasizes the importance of matching wick size to wax type, noting that softer waxes like soy often require a larger wick to achieve an even burn, while harder waxes like paraffin might need a smaller one to avoid overheating. They recommend testing multiple sizes within the same series to find the best fit.
Test Burns: Your Candle-Making Superpower
Test burns are where the magic—and the frustration—happens. They’re the only way to know if your wick choice works, and skipping them can lead to candles that look beautiful but burn poorly. Here’s how to do it right:
Start with a Range: Pick 2–3 wick sizes in the same series (e.g., CD-8, CD-10, CD-12) based on your container or mold size. Pour small test candles with each wick, keeping wax type, fragrance load, and scent consistent.
Burn in Stages: Light each candle and let it burn for 3–4 hours, enough to form a full melt pool (ideally 1/4 inch deep, reaching the edges). Note the flame size, melt pool depth, and any soot or tunneling. I’m currently test burning a wick for a molded skull candle, and after the first burn, I noticed the flame was too small, leaving a lot of unburned wax around the edges—time to size up!
Adjust and Repeat: If the flame is too small (tunneling), go up a size. If it’s too large (sooting, overheating), go down. Repeat the test burn with the new wick size. It might take several rounds to find the right one.
Consider Variables: Test the same wick with different fragrance loads or scents.
Molded Candles: Embracing the Imperfect
Molded candles, like my skull-shaped ones, are a special challenge. The odd shape—narrow at the top, wider at the base—means the melt pool forms unevenly. I’ve learned there may not be a “perfect” wick size for these. A wick that melts the top evenly might leave wax at the bottom, and one that handles the base might burn too hot at the top. In these cases, don’t let perfect be the enemy of good enough. Aim for a wick that gives a decent burn without excessive soot or tunneling, even if it’s not flawless. Test burns are your guide—don’t skimp on them, even if it means burning through a few candles to get it right.
Final Thoughts
Wick selection and test burns are the backbone of candle making, and they’re especially crucial for beginners. It’s a process that takes patience, but the reward is a candle that burns cleanly, safely, and beautifully. Whether you’re working with soy, beeswax, or coconut wax, using cotton, hemp, or wood wicks, or pouring into jars or molds, take the time to test and tweak. Resources like CandleScience’s wick guide can point you in the right direction, but nothing beats the real-world data of a test burn. So, light up, take notes, and don’t be afraid to experiment—your perfect candle is just a burn away.
What’s your biggest candle-making challenge? Share your tips and tricks with us at The Angelina Store—we’d love to hear from you!
Tags: wood wicks for candlesbeginner candle making tipsbeeswax candle wickscandle tunneling fixCandleScience wick guidefragrance load impactmolded candle wickscotton wicks for candlessoy wax wickscandle burn issueschoosing candle wickstest burns for candlescandle making for beginnerscandle wick selectionThe Angelina Store
